Getting your horse on the bit is considered the Holy Grail of dressage. It may seem mysterious and hard to grasp, but the good news is anyone can learn what to do, and then do it!

Making Contact
Once your horse has met the requirements of rhythm and suppleness (see The Dressage Training Scale), you are ready to take up contact in order to start making a connection.
There are five qualities that make up an inviting contact: it should be firm, consistent, elastic and symmetrical, and you need to have a straight line from the bit through your hand to your elbow.
“But there’s good lightness and bad lightness; ‘bad lightness’ indicates that there’s no connection with your hand—instead, you want a firm connection.”
“A lot of times, people at the basic levels (Introductory and Training) are concerned with having the horse very light in their hand,” says Savoie. “But there’s good lightness and bad lightness; ‘bad lightness’ indicates that there’s no connection with your hand—instead, you want a firm connection of a half pound to a pound.”
Your horse won’t object to a firm connection if you have consistent and elastic contact, which requires a straight line from the bit to your elbow. “The reins shouldn’t get loose and then tight,” says Savoie. “Your horse won’t care if the rein is loose, but he will definitely notice if you keep jerking him in the mouth.
“The elasticity of the contact depends on what gait you’re in—at the walk and canter, the horse uses his neck as a balancing rod forward and back, so your elbows have to open and close to allow for that movement of the horse’s neck,” Savoie continues. “If you’re stiff with your elbows, then your horse is going to run into your hand and either come above the bit or curl behind it to avoid the inelastic contact.”
For a better understanding of contact at the walk and canter, Savoie says to picture a jockey galloping down the racetrack with his elbows opening and closing, almost like he’s pushing the horse’s neck forward on each stride of the gallop. “Sometimes I have riders get up into a two-point and do ‘jockey arms,’ then tell them to keep their arms moving like that after they sit back down in the saddle.”
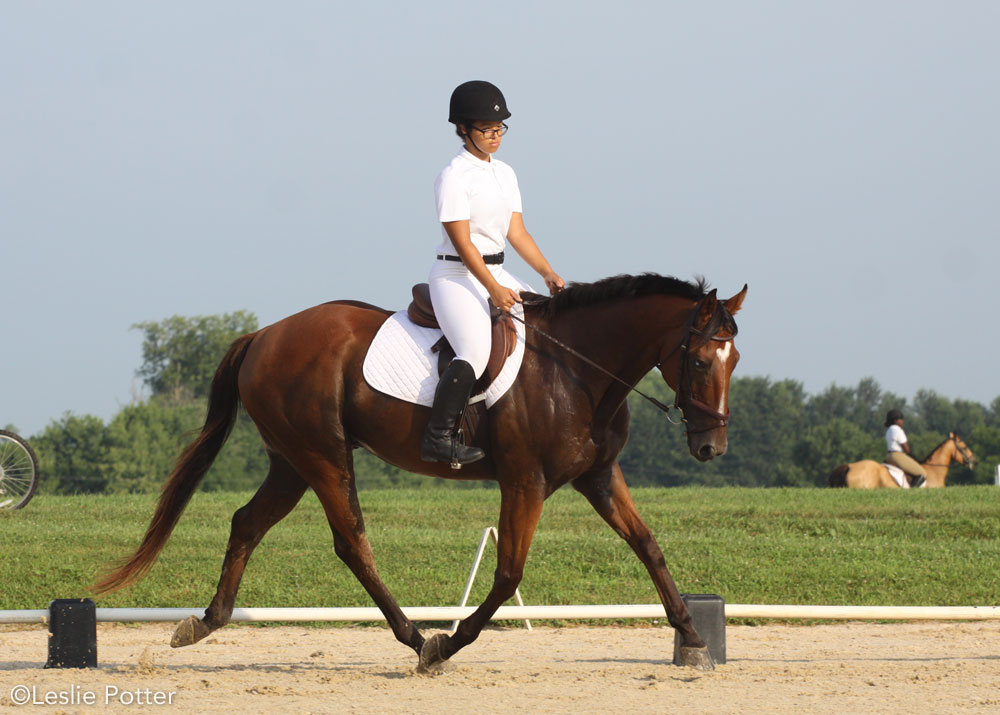
The trot differs from the walk and canter in that the horse’s neck doesn’t move forward and back. Instead, the rider moves up and down. “If you keep your elbows locked, your hands will go up and down and disturb the contact,” explains Savoie. “An image I use that’s helpful for riders when trotting is to picture an old-fashioned washboard: as they post up, they push their hands down, washing the clothes. Your elbows open more like a hinge in rising trot, as opposed to a boat-rowing motion in the walk and canter.”
The symmetrical element of an inviting contact refers to your hands being mirror images of one another: they should be at the same height and equidistant from your body, and the thumbs should be the highest point.
These prerequisites fulfill the first three elements of the dressage training scale. Once you’ve practiced them, you’re ready to learn the connecting aids that will put your horse on the bit.
By the Letter
Training a horse to go on the bit “is like teaching him a foreign language,” according to Savoie. “If you were to learn Russian, Chinese or Hebrew, you wouldn’t be able to read a whole sentence at once; first you would need to learn the alphabet because their characters are different. Eventually, you can put those letters together to form a word.
“‘Connection’ (riding on the bit) is a word to your horse because it combines some of the letters of the alphabet,” Savoie continues. “You need to know what your seat, legs and reins can control, and you need to teach your horse each of those aids individually.”
- LEGS: Your legs give the aids for upward transitions; they ask for activity (your inside leg asks for activity of the hind legs); and they control the position of the hindquarters.
- SEAT: Your seat controls your horse’s rhythm, speed, length of stride and all downward transitions. “The potentially dangerous thing about that is you can also control these things with the reins,” cautions Savoie. “You can get from trot to walk by pulling on the reins, but this blocks the hind legs from coming forward, creating a chain reaction: The hind legs stop going forward, the back goes down, the neck goes up, and the horse comes above the bit. You have to be very aware of what you should be doing with your seat.” To slow your horse with your seat, still the following motion of your hips and contract your stomach muscles, like you’re doing a sit-up. Once your horse understands this cue, you won’t need to pull on the reins to slow down.
- HANDS: So when is the right time to use the reins? “The reins control flexion to the left and right at the poll; flexion ‘in’ at the jaw; the length and height of the neck; and the position of the forehand,” says Savoie. “If you wanted to do a shoulder-in, you would move your hands in the direction you want to move your horse’s shoulders.”
Getting on the Bit
Once your horse understands how each part of your body affects him, you’re ready to form the word “connection” (or “on the bit”). “You are combining three sets of aids—your driving aids, your bending aids and your rein of opposition (outside rein),” explains Savoie. Once you understand this principle, you’re ready to ask your horse to go on the bit.
“When my students are just learning how to combine these aids, I tell them to close their calves on the horse the way they would if they were asking for a lengthening within the trot or the canter,” continues Savoie. “Every set of connecting aids should contain that surge you would feel if you were going into a lengthening. To be sure you’re riding from back to front, and not from front to back, wait for one step of the lengthening before asking for anything with the reins.

“Then, after you’ve created that energy, close your outside hand in a fist to capture, contain and recycle that energy back to the hind legs,” says Savoie. “You’ll hold those aids for about three seconds, which is the length of time it takes you to inhale and exhale. However, this might cause the horse to bend his neck to the outside, especially on his hollow side; therefore, he’s not straight, and the aids can’t go through.” This is where your bending aids come in.
Your bending aids are made up of your inside rein and your legs, and since you’re already using your legs as driving aids, you’re left with the inside rein. “Give three little squeezes and releases with your inside rein to counter the action of the closed outside hand,” says Savoie. “You can think of it as vibrating the rein, or squeezing the water out of a sponge.” You can say the words “twinkle, twinkle, twinkle” to help you remember the timing of the three squeezes.
Although vibrating the inside rein will cause the horse to flex at the jaw, it’s very important to not begin your aids with this step. It may create the “head down” look, but you never want to ride your horse from front to back. The inside rein is used last to counter the other aids and keep your horse straight.
“To the naked eye, it looks like those three sets of aids are done at the same time, but if you watched it in freeze-frame photography, you would see the rider’s legs close first, then the outside hand close in a fist, then the inside hand squeeze-release, squeeze-release, squeeze-release, and then soften,” says Savoie. “After those three seconds, your aids go back to maintenance pressure.”
In Part Two of Dressage Mysteries Solved, Savoie will cover some of the ways to test your connection and troubleshoot common problems if you find that your horse is evading your aids.
This article originally appeared in the January 2010 issue of Horse Illustrated. Click here to subscribe.


I am very interested in learning to ride dressage. It has been 20 years since I have been on a horse and plan tostart riding agian next year and would like to get into dressage lessons. I found this article very interesting and informative.